
Thursday, July 31, 2014
Keeping up with the class
Wednesday, July 30, 2014
On top of working on an online course and promising myself to finish more projects I have finally finished collecting the supplies I need for kumihimo beaded braiding. I also have the round loom, square loom, thread bobbins, and now I need the patience to follow one pattern through.
If there is ever anything that is so calming it is kimo braiding and I can understand the joy of wanting to try this artform.
Promise to take pics and share my labours with the cording that came in the kit, and the new cording that I will work with.
I think a bracelet is in order.
If there is ever anything that is so calming it is kimo braiding and I can understand the joy of wanting to try this artform.
Promise to take pics and share my labours with the cording that came in the kit, and the new cording that I will work with.
I think a bracelet is in order.
Saturday, July 26, 2014
Kathy Shaw's online class
I have my work cut out for me this weekend. I want to embroider the seams on the quilt block that Kathy has designed. I cannot show pictures in progress as this is a copyrighted online class, but it is so well structured that after crazy quilting for well over ten years it is amazing what one can still learn, and learn a lot from someone who specializes in this art form.
Panels to Quilt
.JPG)

The above is a series of panels that I put together into a wall hanging for my sister in law. I love the colours in the oak leaf and acorns and would love to make this on a smaller scale. \once she has this quilted we will put prairie point borders on it to make it look country. The rusts greens and browns in this particular block truly bring it to life and being so oversized the large print on the oak leaves works well. I would make the block a bit smaller, add some faded vintage beige for background and then pick up the colours and stitck with all rust rather than the rust red, but in the larger blocks it does look lovely.
Friday, July 25, 2014
Ready for Quilting
.JPG)
This is one block from Peck's Piece's Spooky Halloween quilt. I have done one of these blocks in the past and donated it to a local nursing home.
This one needs some embroidery, cat's eyes, whiskers and a spider and web, and then it will be sandwiched for handquilting. I found just enough of the bargello type orange multi fabric to make it stand out.
Thursdays findings.
.JPG)
.JPG)
Photos of hand quilting in progress of Medallion Wall quilt My Tweets by Erin Russek. Have only spent two afternoons quilting and just love the work ont his one. Where you see vines there will be three dimensional flowers attached.
In the large vine above will be three large ink overdued flowers with centres, and in the vase below will be rusched roses and three dimensional leaves. At the end of the bottom spray of vines will be yellow brown eyed susans.
Thursday, July 24, 2014
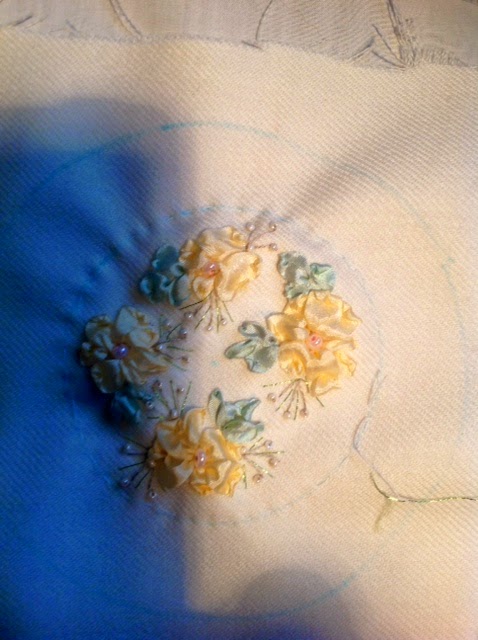
Directions for round disks.
Materials:
6 inch square of muslin for backing.
6 inch square of main fabric - my choice wool linen
wash out pen or pencil
Colours of silkribbon you chose.
Used cd disk
Jar lid from small canning mason jar.
Odds and ends of beads and metallic threads for embellishments.
Charms
I make mine in multiples of four, in other words, I cut my muslin and main fabric twelve inches suare, then I run a large basting line around the edge to keep them from shifting.
I trace four cd's two top and two bottom for the large outer circles.
I centre the lid of a mason jar and trace around this. I then use a contrasting thread and
stitch a gathering line around this for later use.
I then decide where I want my flowers and what direction to make them fall. I add a small
circle for each rose and then have vines that draw out from this.
I make my own version of a rose using a silkribbon straight stitch, add leaves with same stitch, then embroider vines, add beads and embellish.
Once completed I then cut out beyond the orignal large circle and run a gathering stitch around this with strong thread.
Place a small piece of batting in the centre, gather the finished piece over the lid and secure with thread. Add a piece of finished felt to hide the threads.
Screw onto top of mason jar, then add goodies.............sewing materials..............mints..........a
touch of chocolate.................buttons..............collelctibles..........lace.............a kit in a jar etc. and you have a finished gift that they will definitely not recycle.


Sunday, July 20, 2014
Assignment one and two
Have finished assignment one and two on the blog for Kathy Shaw, and what a learned experience this has been. One really does not ever know all that there is to know about a style of quilting, or how controlled it can be until they take a class from Kathy. This is not the block we are working on, but this is the style of quilting that I would like to move forward with. This is one of my own personal designs.

Friday, July 18, 2014
Getting projects lined up.
I have decided to try and allocate finishing some projects I have started and to set up different projects that I can work on at different times of the day or when I just need a break.
I bought the new McCall's quilts magazine and have plans for making the Erin Russek design in a different colourway for myself. I love her work and her quilts offer a challenge with a twist. This one is larger, but so are the applique pieces and it leaves a lot of room for hand quilting.
I hope to get out and get some ends for the kumi bracelets that I have completed and start a few braided bracelets as well I love beads that compliment each other in a braid. I have plans on doing a beaded kumi necklace and bracelet set for myself.
Well, it has been a long day, and it is late so I will sign off for now and write more tomorrow.
Today is the tomorrow you worried about yesterday.
 I hope to incorporate some silkribbon work into this little masterpiece sometime soon. It was a free design on the internet and it keeps calling out to be embellished and highlighted.
I bought the new McCall's quilts magazine and have plans for making the Erin Russek design in a different colourway for myself. I love her work and her quilts offer a challenge with a twist. This one is larger, but so are the applique pieces and it leaves a lot of room for hand quilting.
I hope to get out and get some ends for the kumi bracelets that I have completed and start a few braided bracelets as well I love beads that compliment each other in a braid. I have plans on doing a beaded kumi necklace and bracelet set for myself.
Well, it has been a long day, and it is late so I will sign off for now and write more tomorrow.
Today is the tomorrow you worried about yesterday.
I hope to incorporate some silkribbon work into this little masterpiece sometime soon. It was a free design on the internet and it keeps calling out to be embellished and highlighted.Thursday, July 17, 2014
I am hoping that by signing up for Kathy Shaw's latest class that it will motivate me to be more productive in my art work. I have collected my supplies and even in this humidity want to get started right away.
I have sane quilt tops to share as well as finished items and will take pics and share before the end of the week. But off to line up my materials for a photo shoot for Kathy and then proceed to lesson one.

I have sane quilt tops to share as well as finished items and will take pics and share before the end of the week. But off to line up my materials for a photo shoot for Kathy and then proceed to lesson one.
Although this is not a crazy quilt, it is a pattern I would love to be able to do someday, not sure what pinterest account this came from but it looks so enchanting.
Sunday, March 17, 2013


My Blue Angel

Truly enjoyed embroidery work and handquilting on this wall quilt and is one of my favourites.

Anniversary Quilt

The above started as a project to challenge myself different styles and types of embroidery in one block and when done was going to become a large ruffled pillow. I could not find the fabric I wanted to border this so decided to turn it into a wall quilt. My dh made the wall mount for this as he does all of my quilts.
My Floor swivel Frame.
 The above frame was designed by a special friend to see if it could also be adapter to a wheelchair, and I am pleased to say that it can. I use my frame in a big comfy chair most of the time.
In front of a power chair, it has the ability to put the foot stand down and still quilt if I am confined to this at the time. Normally I do not quilt in a wheelchair.
Friday, March 15, 2013
Miss Kay by Erin Russek
I did this block as my first large applique project. I have not used large flowers before and this one has captivated my heart.
I have added the in progress pictures to show a fellow quilting friend, how I chose to handquilt this one.
I can only do straight line quilting on the ones that I have given to a local nursing home, but will always do handquilting until I can perfect machine quilting.
This block is missing the dimensional circles at the peaks of the tulips and I plan on adding some dimensional butterflies twitting amongst the flowing daisies.
I enjoyed hand appliquing this piece and the pattern is available at Erin's blog ' One Piece At A Time."
 I always have more than one project on the run at a time.


I have added the in progress pictures to show a fellow quilting friend, how I chose to handquilt this one.
I can only do straight line quilting on the ones that I have given to a local nursing home, but will always do handquilting until I can perfect machine quilting.
This block is missing the dimensional circles at the peaks of the tulips and I plan on adding some dimensional butterflies twitting amongst the flowing daisies.
I enjoyed hand appliquing this piece and the pattern is available at Erin's blog ' One Piece At A Time."


Detail of one corner

Not pleased until I added cross hatching and it made the flowers pop as well.
Easter Blessings in progress

Tuesday, September 25, 2012
Slow Works in Progress
Today I added some wedding vintage lace to two corners of a silkribbon art design that I had not decided on quite how to finish. I truly don't want it to be a pillow as they have a habit of being scrunched unless they are on the long ottoman at the end of the hall.
I have also set aside some gorgeous silk to work two more designs up, one in a pastel grey and one in a vintage muted green.
I am also wandering back to my pink and beige and lace stages.
I have also finished the applique on five of the blocks from the My Tweets quilt from Erin Russek and have two more nearing the stage where they will be appliqued down as well
I did finish her Miss Kelly and love it, now to find the time to hand quilt, and share the pictures.

Have a great day ................not to mention, I have been designing and using puppy pads as my little pomeranian is having accident with his bladder so a belly band was needed and rather than purchase these have designed my own version for little puppies.
Stitch your dreams.
I have also set aside some gorgeous silk to work two more designs up, one in a pastel grey and one in a vintage muted green.
I am also wandering back to my pink and beige and lace stages.
I have also finished the applique on five of the blocks from the My Tweets quilt from Erin Russek and have two more nearing the stage where they will be appliqued down as well
I did finish her Miss Kelly and love it, now to find the time to hand quilt, and share the pictures.
Have a great day ................not to mention, I have been designing and using puppy pads as my little pomeranian is having accident with his bladder so a belly band was needed and rather than purchase these have designed my own version for little puppies.
Stitch your dreams.
Pictures as promised
Took some quick pictures of the five little quilts that I did on the machine and am sharing here..........the pattern is below.


Subscribe to:
Posts (Atom)